분류 전체보기
- plantuml 공부 2023.06.02
- vimrc 2023.05.31
- tmux configuration 2023.05.31
- register dump debugfs 2023.02.19
- CI/CD (Continuous Integration/Continuous Delivery) 2023.02.07
- [Linux kernel] Comprehension of device tree 2023.01.30
- Visual Studio Code 자주 쓰는 단축키 모음 2023.01.29
- 블로그 시작.. 2023.01.29
plantuml 공부
2023. 6. 2. 11:34
vimrc
2023. 5. 31. 22:45
set nocompatible " be iMproved, required
filetype off " required
" set the runtime path to include Vundle and initialize
set rtp+=~/.vim/bundle/Vundle.vim
call vundle#begin()
" alternatively, pass a path where Vundle should install plugins
"call vundle#begin('~/some/path/here')
" let Vundle manage Vundle, required
Plugin 'VundleVim/Vundle.vim'
Plugin 'scrooloose/nerdtree' "nerdtree
Plugin 'http://github.com/kien/ctrlp.vim' "search file in vim usage : ctrl + p
Plugin 'tpope/vim-fugitive' "git edit plugin
Plugin 'bling/vim-airline' "하단 상태바(현재상태보여줌) usage : \+q, \+w
Plugin 'rking/ag.vim' "find keyword at dir , usage : Ag keyword
Plugin 'http://github.com/terryma/vim-multiple-cursors' "same keword editing sametime usage : ctal + n
Plugin 'scrooloose/syntastic' "syntax check usage : lopen
Plugin 'preservim/nerdcommenter' "convinience comment usage : \+c+i, \+c+m <-> \+c+space
Plugin 'posva/vim-vue'
Plugin 'AutoComplPop'
Plugin 'bogado/file-line'
Plugin 'snipMate'
Plugin 'blueyed/vim-diminactive'
Plugin 'edkolev/promptline.vim' "prompt 해주는건데 모르겠음...
Plugin 'SearchComplete' "검색시에 자동완성tab 키 누르면 됨
call vundle#end() " required
filetype plugin indent on " required
이 후 vim 열고 아래 command 입력
:PluginInstall
'Linux > Linux Util' 카테고리의 다른 글
| tmux configuration (0) | 2023.05.31 |
|---|---|
| [Linux] Tmux 개요와 사용법 (0) | 2023.01.29 |
tmux configuration
2023. 5. 31. 22:33
# 0 is too far from ` ;)
set -g base-index 1
# Automatically set window title
set-window-option -g automatic-rename off
set-option -g set-titles on
#set -g default-terminal screen-256color
set -g status-keys vi
set -g history-limit 10000
setw -g mode-keys vi
setw -g mode-mouse on
setw -g monitor-activity on
bind-key v split-window -h
bind-key s split-window -v
bind-key J resize-pane -D 5
bind-key K resize-pane -U 5
bind-key H resize-pane -L 5
bind-key L resize-pane -R 5
bind-key M-j resize-pane -D
bind-key M-k resize-pane -U
bind-key M-h resize-pane -L
bind-key M-l resize-pane -R
# Vim style pane selection
bind h select-pane -L
bind j select-pane -D
bind k select-pane -U
bind l select-pane -R
# Use Alt-vim keys without prefix key to switch panes
bind -n M-h select-pane -L
bind -n M-j select-pane -D
bind -n M-k select-pane -U
bind -n M-l select-pane -R
# Use Alt-arrow keys without prefix key to switch panes
bind -n M-Left select-pane -L
bind -n M-Right select-pane -R
bind -n M-Up select-pane -U
bind -n M-Down select-pane -D
# Shift arrow to switch windows
bind -n S-Left previous-window
bind -n S-Right next-window
# No delay for escape key press
set -sg escape-time 0
# Reload tmux config
bind r source-file ~/.tmux.conf
# THEME
set -g status-bg black
set -g status-fg white
set -g window-status-current-bg white
set -g window-status-current-fg black
set -g window-status-current-attr bold
set -g status-interval 60
set -g status-left-length 30
set -g status-left '#[fg=green](#S) #(whoami)'
set -g status-right '#[fg=yellow]#(cut -d " " -f 1-3 /proc/loadavg)#[default] #[fg=white]%H:%M#[default]'
#fix pane name
set-option -g allow-rename off
'Linux > Linux Util' 카테고리의 다른 글
| vimrc (0) | 2023.05.31 |
|---|---|
| [Linux] Tmux 개요와 사용법 (0) | 2023.01.29 |
register dump debugfs
2023. 2. 19. 22:52
Program specification
1. C language
2. linux kernel module
3. debugfs
- files : hexdump, range (how many continguous registers could be read)
- command line example : echo 3 > /sys/kernel/debug/register_dump_debugfs/range, cat /sys/kernel/debug/register_dump_debugfs/hexdump
4. register dump
- The register should be showed like hexdump format.
- The address of register is specified in dts file.
'SW development' 카테고리의 다른 글
| CI/CD (Continuous Integration/Continuous Delivery) (0) | 2023.02.07 |
|---|
CI/CD (Continuous Integration/Continuous Delivery)
2023. 2. 7. 11:05
개념
CI/CD (Continuous Integration/Continuous Delivery)란 자동화하여 애플리케이션을 더욱 짧은 주기로 고객에게 제공하는 방법
CI/CD의 기본 개념은 지속적인 통합, 지속적인 서비스 제공, 지속적인 배포.
CI/CD는 새로운 코드 통합으로 인해 개발 및 운영팀에 발생하는 문제(일명 "통합 지옥(integration hell)")를 해결하기 위한 솔루션
CI/CD 의 차이
CI(Continous Integration, 지속적 통합) : 개발자를 위한 자동화 프로세스인 지속적인 통합(Continous Integration), 지속적인 통합이 제대로 구현되면 애플리케이션 코드의 새로운 변경 사항이 정기적으로 빌드 및 테스트를 거쳐 공유레포지토리에 병합됨. 따라서 여러 명의 개발자가 동시에 어플을 개발하므로써 서로 충돌할 수 있는 문제를 이 방법으로 해결할 수 있음
CD(Continous Delivery/Deployment, 지속적 제공) : Delivery와 Deployment는 상호교환되어 사용됨. 두 가지 의미 모두 파이프라인의 추가 단계에 대한 자동화를 뜻하지만 때로는 얼마나 많은 자동화가 이루어지고 있는지를 설명하기 위해 별도로 사용됨
지속적인 제공이란 개발자들이 어플리케이션에 적용한 변경사항이 버그테스트를 거쳐 레포지토리에 자동으로 업로드되는것을 의미하며, 운영팀은 이 레포지토리에서 어플리케이션을 실시간 프로덕션 환경으로 배포함. 이는 개발팀과 비즈니스팀간의 가시성 및 커뮤니케이션 부족 문제를 해결해 줌
지속적인 배포(또다른 의미의 CD;Continous Deployment) 란 개발자의 변경사항을 레포지토리에서 고객이 사용가능한 프로덕션 환경까지 자동으로 릴리스하는것을 의미

CI/CD tool 예시
- Jenkins : build, test, deploy 등의 전반적인 CI/CD 를 할 수 있게 만드는 Open-Source tool
- Travis CI : Cloud-based tool, Github 기반 open-source project에 대중적인 CI tool
- AWS CodePipeline : Amazon WebServices에 의해 제공되는 cloud-based tool
- GitLab CI/CD, CircleCI 등
자료 출처 : https://www.redhat.com/ko/topics/devops/what-is-ci-cd
'SW development' 카테고리의 다른 글
| register dump debugfs (0) | 2023.02.19 |
|---|
[Linux kernel] Comprehension of device tree
2023. 1. 30. 20:48
Device tree
- Device tree 는 시스템안에 존재하는 device들을 명시하는 노드들로 구성된 tree data structure를 의미한다. 각 노드는 각 디바이스의 특징들을 표기한 property/ value 쌍으로 이루어져 있다. 디바이스 트리는 루트노드를 제외하고 정확히 하나의 parent를 갖는다.
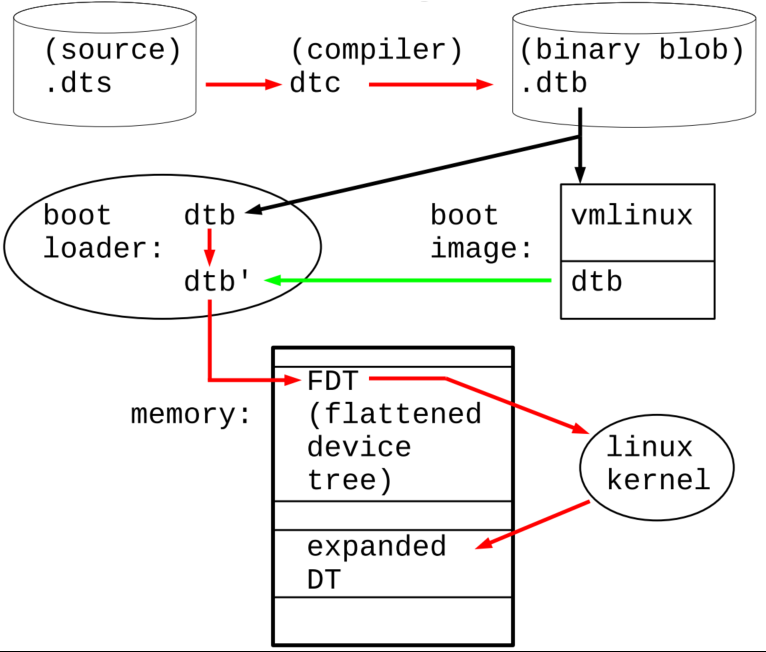
Device tree의 Life Cycle
- device tree는 아래 그림과 같은 Life Cycle을 갖는다. 프로그램에도 소스,컴파일러와 바이너리가 있듯이, device tree도 소스인 .dts 파일과 컴파일러인 dtc, 컴파일의 결과물인 .dtb파일이 존재한다.
- 컴파일에 의해 생성된 .dtb파일은 boot loader에 의해 메모리에 FDT(flattened device tree)형태로 적재되고 이 후에 linux kernel에 의해 expanded DT형태로 변환되어 dt사용자가 API함수(eg. of_function)호출을 통해 dt를 사용할 수 있게 된다.
- Device driver를 사용하는 입장에서는 dts와 Expanded DT가 어떻게 연관되어 있는지를 알면 dt를 사용할 수 있다.
Device tree source
- Device tree source 파일은 dts와 dtsi 등의 여러개의 파일로 구성된다.
- .dts파일은 최상위 Device tree 파일로, 복 수 개의 .dtsi 파일들을 포함한다.
- .dtsi 파일에는 SoC-level 정보가 정의되어있는것이 일반적이다.(필수사항은 아니다.)
- .dts 파일에는 board-level의 정보를 포함하는것이 일반적이다.

Expanded DT format
- tree 구조
- of_*() 함수 호출을 통해 접근할 수 있다.
- 모든 노드가 Linked list로 연결되어 있다.
- boot가 이루어지는 동안 생성된다.
- boot 이 후에 Node와 Property가 추가되거나 삭제될 수 있다.
- 아래 그림은 Expanded DT format의 하나의 node의 정보를 담는 device_node 구조체이다.

트리 순회
- 좌측 상단의 root node로부터 시작하여 child는 자식노드, Sibling은 같은 레벨에 있는 형제노드, allnext노드는 Depth first로 다음 노드를 가리킨다.
- 마지막 노드는 allnext 가 NULL pointer를 가리킨다.

Visual Studio Code 자주 쓰는 단축키 모음
2023. 1. 29. 19:18
참고로 VScode 단축키는 Preferences: Open Keyboard Shortcuts에서 얼마든지 수정가능

명령
ctrl + shift + p : command pallete
ctrl + p : file quick Open
ctrl + , : User Settings
창관련
ctrl + \ : 수평분할
ctrl + k , ctrl + \ : 수직분할
ctrl + w : 창끄기
ctrl + tap : 탭이동
ctrl + b : 왼쪽 사이드바 지우기/열기
텍스트
ctrl + k + f : 자동정렬
ctrl + d : 단어 한번에 바꿔주는 단축키(커서에 위치한 단어를 찾아줌, 계속 눌러야 여러 개 다 찾음
ctrl + home/end : 맨첫줄 혹은 맨 마지막 줄
ctrl + / : comment in/out
ctrl + ` : Toggle Terminal(터미널 껐다 켰다)
ctrl + k + s : command list
ctrl + enter : insert next line (어느 곳에 위치해있던)
ctrl + u : undo last cursor
alt + shift + i : 블록 선택 후 드래그한 영역에 커서 위치
alt + click : 커서를 여러 개 늘려줌(한번에 늘리고 싶을 떄)
alt + up/down : 해당 라인을 위아래로 이동시켜줌 (Move line down/up)
alt + shift +up/down : 해당 라인을 복사시켜줌
alt + shift + drag : 여러라인 커서 선택(왼쪽 일부열만 선택하고 싶을 경우)
alt + ctrl + up/down : 멀티커서
alt + ctrl + left/right : 좌우탭으로 분리
ctrl + Y : redo
ctrl+K+C : 주석
ctrl + g : goto line number
함수
ctrl + k + 0(숫자0) : 함수 전체 접기
ctrl + k + j : 전체 펼치기
ctrl + shift + [ : 현재 영역 접기
ctrl + shift + ] : 현재 영역 펼치기
f12 or ctrl + click : definition 이동,
alt + 왼쪽 방향키 : undo goto definition
alt + 오른쪽 방향키 : redo goto definition
go to bracket : ctrl + shift + \
() 또는 {} 괄호의 시작점이나 끝점으로 이동함
터미널
ctrl + j : show/hide terminal
ctrl + up : 이전 command 입력
ctrl + alt + j : 터미널 전체크기 (customized)
Ctrl+Shift+` : 새로운 terminal open
블로그 시작..
2023. 1. 29. 19:13
지금까지 공부하고 연구했던 것들을 극비사항인것 마냥 비공개인 원노트에 저장하고 있었는데
윈도우즈10 원노트의 타자 빠르게 입력시 한글깨짐 현상과 플러그인을 사용하여 자유롭게 형태를 변경할 수 없기에 블로그를 개설하여 이것저것 남겨보기로 함.
하루 10분씩이라도 투자하여 잘 만들어 봅시다!!